Prelude
Having been sleepless for a long time, I finally decided to make some improvements on that vintage smartphone Xiaomi 1S. It had been rumoured, and had been true, that support for this device had been officially dropped. Typically, one would not bother to make further modifications to that device, as many have appeared to be, instead adhering to its original, obsolete firmware that was released aeons ago. Should I attempt to fix it, in a way, it should at least be working in an appropriate way.

The battery was outdated anyway, and there should be some attempts to retrieve a newer and more long-lasting battery for that model. I had not truly succeeded in this because I had never decided to use this phone in any way. It was just an experiment, to save some device from being bricked or merely test my abilities.
This post would describe the whole process in detail, with figures of course. If you want to see more please enter this post for more information.
Warning: Before you take any actions following the instructions in this post, be sure you have read all the text inside this post. Cross references are linked everywhere without notice. Sometimes precautions are mentioned after the occurences in the post.
Catastrophe
The whole device came into appearance a day ago, when I discovered a few ashes in the Downloads folder, where some bits of unused firmware laid around without order. Instead of cleaning them up, why shouldn ‘t I apply them to the phone, thought I. So I took out the phone, and tried to apply the update.zip s to the device.
Sadly MIUI5 did not accept these firmware packages, in plain words. It simply denied the installation. Neither did its recovery ROM accept it. So I tried to flash in a CyanogenWorkMod recovery, which was a success. The fedora in the centre explicitly stated the success in the procedure, which led me to the next process.

Following that I pushed the update.zip to the /system path, which terminated amidst the operation. After a few tries I knew that it was lack of disk space. Partitioning in Android was particularly difficult, since it wasn’ t provided with GUI tools, nor was it provided with remote partitioning applications. The only things we have are parted and fdisk.parted was more advanced than the latter, while it would fail to display message when encountering problems.fdisk, on the other hand, would devote its most efforts to unveil the partitioning hierarchy to the user, but was harder to use.
So with a couple of failed attempts (now I am completely blocked out of the Android system since I wiped it out), I decided to wipe the last 6 partitions which contained /system and /system1, with later suspect on /recovery. Thereafter I was denied access to recovery too.ADB went completely blank and SSH did not work. The only thing I have was fastboot, with which I booted the phone with recovery.img with the command:
fastboot boot D:/recovery.imgThough recovery restored, I still SSHed the device into wiping the entire partition table (primary partitions 0 to 3, and logical partitions 0 to 19). This, however, also wiped out fastboot, which made it completely impossible to fix it through easy terms.
I did nothing but bricked this phone.
Unbricking
When I was flashing the firmware of my broken Sandisk Ultra a few weeks ago, I also bricked the flash drive in some way. Had I fixed it, but after shorting two jumper pins of the controller chip on its motherboard. There must be some way to reset this phone in a similar way.
The device could not enter Android (exactly), nor could it enter recovery since it was wiped out, and it could not enter fastboot either. Yet when it was plugged into the computer a device named QHSUSB_DLOAD was displayed in the Device Manager. This might be a serial debugging device.
After I retrieved the driver of this piece of bricked hardware, I installed it with complication onto the computer. It was not digitally signed, and since I run an operating system later than Windows 7, I had to reboot the computer, enter the boot menu, and override the boot options in “troubleshoot” in order to disable the mandatory driver signature verifications.

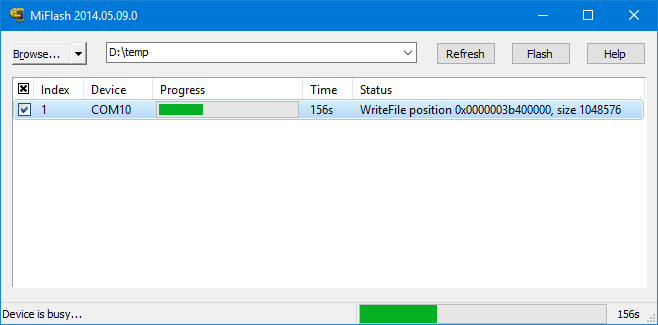
After this, we can burn the official Xiaomi image onto the phone through the virtual COM1 port. The process might take 200 seconds or around that number, but eventually it will complete. After this the phone becomes unbricked again. Similar approaches can be found, and those who bricked their devices can refer to this post for more discoveries.
Re-partitioning
The original steps and information refers to another position:http://www.miui.com/thread-960573-1-1.html
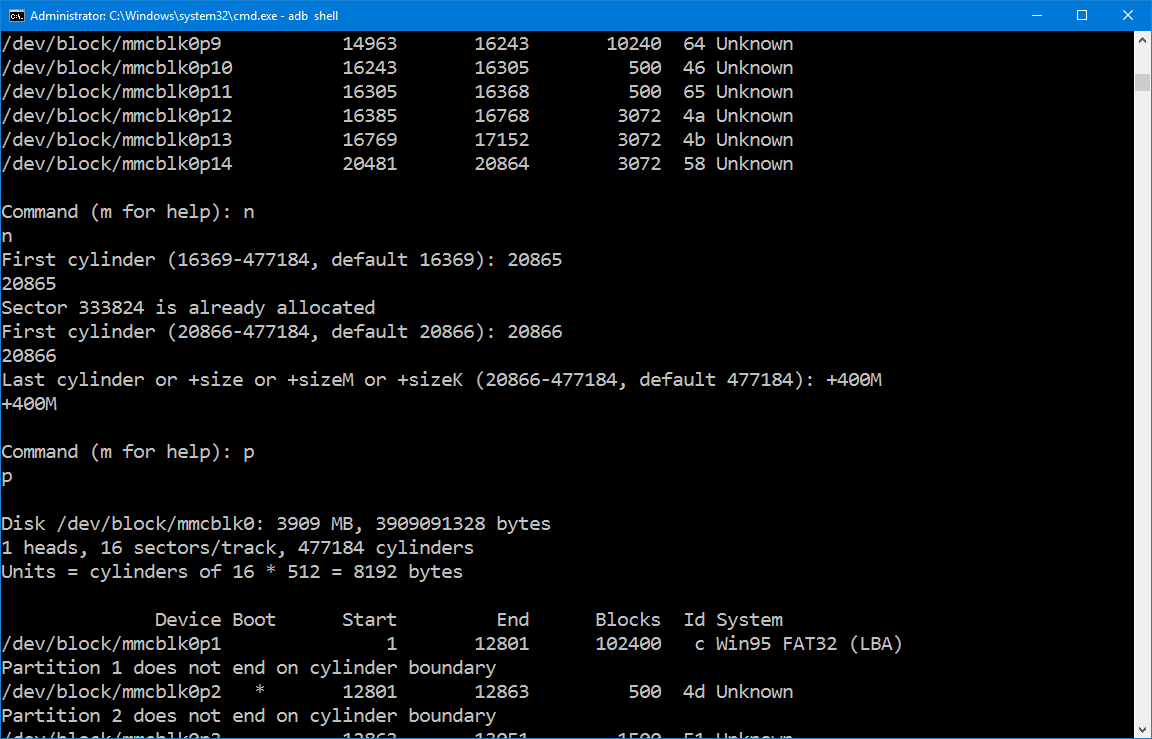
We enter the CWM again, and wipe all partitions including /cache,/data,/system,/system1 et cetera. Most firmwares require at least 300MB of free space on /system, so we must make space for them. This induced the requirement of fdisk, which we shall introduce later. Using fdisk is rather dangerous, due to its low level access to hardware. The following is the result of the re-partition process:
~ $ fdisk /dev/block/mmcblk0

The number of cylinders for this disk is set to 477184.
There is nothing wrong with that, but this is larger than 1024,
and could in certain setups cause problems with:
1) software that runs at boot time (e.g., old versions of LILO)
2) booting and partitioning software from other OSs
   (e.g., DOS FDISK, OS/2 FDISK)

Command (m for help): print

Disk /dev/block/mmcblk0: 3909 MB, 3909091328 bytes
1 heads, 16 sectors/track, 477184 cylinders
Units = cylinders of 16 * 512 = 8192 bytes

              Device Boot      Start         End      Blocks  Id System
/dev/block/mmcblk0p1               1       12801      102400   c Win95 FAT32 (LBA)
Partition 1 does not end on cylinder boundary
/dev/block/mmcblk0p2   *       12801       12863         500  4d Unknown
Partition 2 does not end on cylinder boundary
/dev/block/mmcblk0p3           12863       13051        1500  51 Unknown
Partition 3 does not end on cylinder boundary
/dev/block/mmcblk0p4           13051      477184     3713071+  5 Extended
Partition 4 does not end on cylinder boundary
/dev/block/mmcblk0p5           13052       13114         500  47 Unknown
/dev/block/mmcblk0p6           13114       13370        2048  45 Unknown
/dev/block/mmcblk0p7           13370       13683        2500  4c Unknown
/dev/block/mmcblk0p8           13683       14963       10240  48 Unknown
/dev/block/mmcblk0p9           14963       16243       10240  64 Unknown
/dev/block/mmcblk0p10          16243       16305         500  46 Unknown
/dev/block/mmcblk0p11          16305       16368         500  65 Unknown
/dev/block/mmcblk0p12          16385       16768        3072  4a Unknown
/dev/block/mmcblk0p13          16769       17152        3072  4b Unknown
/dev/block/mmcblk0p14          20481       20864        3072  58 Unknown
/dev/block/mmcblk0p15          20866       69694      390632  83 Linux
/dev/block/mmcblk0p16          69696       76544       54792  83 Linux
/dev/block/mmcblk0p17          77825       79104       10240  60 Unknown
/dev/block/mmcblk0p18          81921       82944        8192  83 Linux
/dev/block/mmcblk0p19          82946      105984      184312  83 Linux
/dev/block/mmcblk0p20         105986      355986     2000008  83 Linux
Discover the two system partitions, and remove all partitions after these two, including themselves, but the approximate size must be remembered for the sake of adding them later.

Remake the two systems, one large and one small. The larger should have about 400MB of space, leaving the smaller one with around 50MB free space. After the remake, the ones which should have been untouched should be re-added to the partition table. When the partitioning utility informs you that the cylinders are already in use, increment the cylinder count, which might solve the problem.
Partition types (i. e. 0x60/Unknown instead of 0x83/Linux) should be restored to their original states before applying changes. These must also be taken into consideration.
After this whole lot of trouble, write the changes to disk. If you are not sure what you are doing, do not write changes. If you made a mistake, feel free to quit the utility anytime before writing the changes.
Fixing Partitions
Before we continue to installing the ROM, we must make sure these partitions are mountable. Enter these commands into the SSH terminal:
mount -t ext4 /dev/block/platform/msm_sdcc.1/by-name/system /system
mount -t ext4 /dev/block/platform/msm_sdcc.1/by-name/userdata /data
# Or those with equivalence on most situations:
mount -t ext4 /dev/block/mmcblk0p15 /system
mount -t ext4 /dev/block/mmcblk0p20 /data
If any problems occur, such as the following messages:
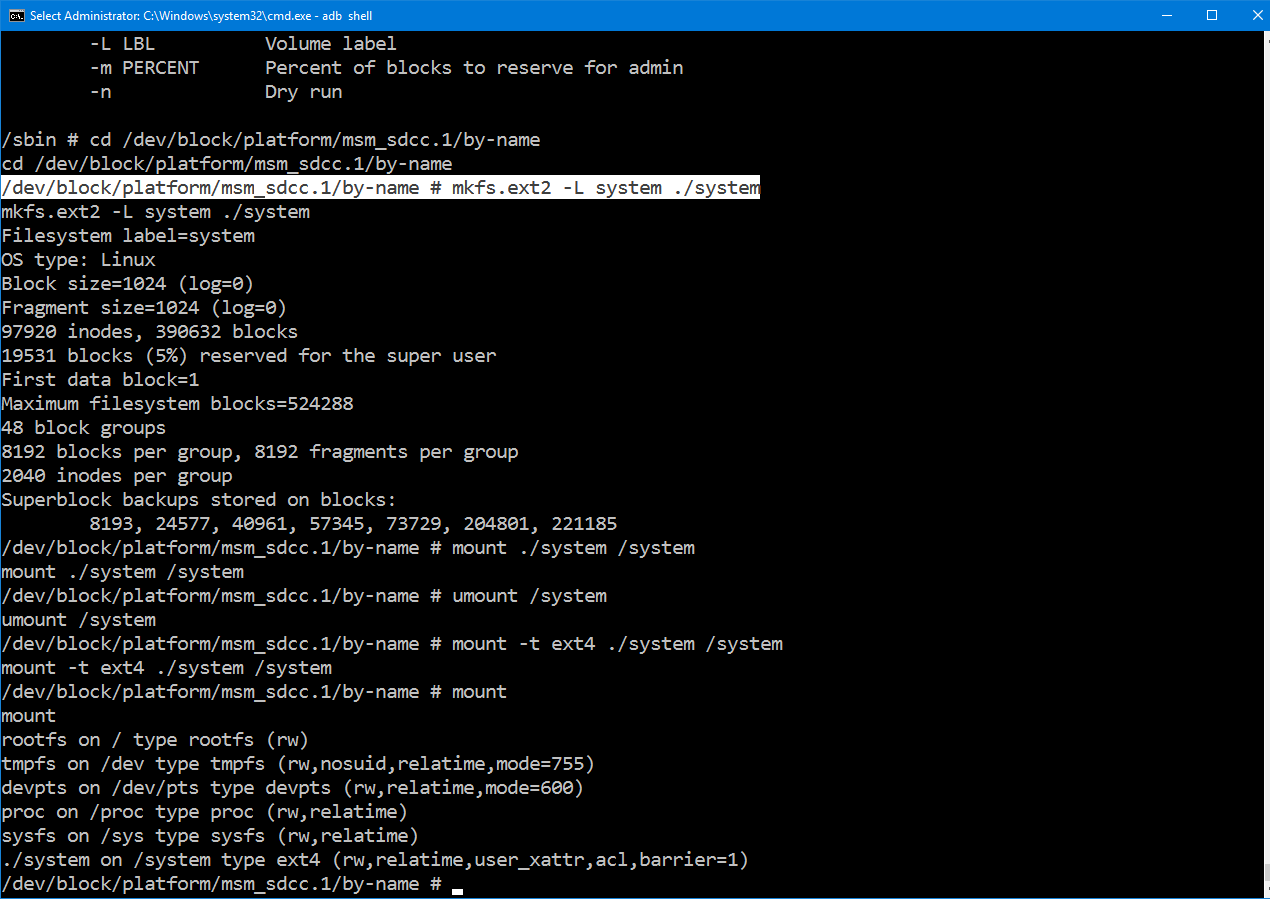
mount: mounting /dev/block/platform/msm_sdcc.1/by-name/system on /system failed: Invalid argumentThen that means the new partitions are not formatted, as in the usual case. This means that you ‘ll have to remake the partitions in order for them to work. Type in the shell commands to ensure you have the right and working partitions.
/dev/block/platform/msm_sdcc.1/by-name $ mkfs.ext2 -L system ./system
mkfs.ext2 -L system ./system
Filesystem label=system
OS type: Linux
Block size=1024 (log=0)
Fragment size=1024 (log=0)
97920 inodes, 390632 blocks
19531 blocks (5%) reserved for the super user
First data block=1
Maximum filesystem blocks=524288
48 block groups
8192 blocks per group, 8192 fragments per groups
2040 inodes per group
Superblock backups stored on blocks:
        8193, 24577, 40961, 57345, 73729, 204801, 221185
/dev/block/platform/msm_sdcc.1/by-name $ mount -t ext4 ./system /system
mount -t ext4 ./system /system
/dev/block/platform/msm_sdcc.1/by-name $ umount /system
umount /system
In the same way you could create the data partition, but for older Linux kernels, this might not be the situation. You may experience troubles on creating the /data partition on older kernels, especially with partition sizes larger than 2GB. One can tell the reason, is that 32-bit systems can’ t address large files. For this problem, we could simply sacrifice the size of the partition instead of bothering to flash another kernel (which I didn ‘t try).

After these operations, all partitions should be functional. View /etc/fstab for details, as it should be working well. Or, you could simply check the mount points after you have test-mounted the partitions:
/ $ mount
mount
rootfs on / type rootfs (rw)
tmpfs on /dev type tmpfs (rw,nosuid,relatime,mode=755)
devpts on /dev/pts type devpts (rw,relatime,mode=600)
proc on /proc type proc (rw,relatime)
sysfs on /sys type sysfs (rw,relatime)
/dev/block/platform/msm_sdcc.1/by-name/system on /system type ext4 (rw,relatime,user_xattr,acl,barrier=1)
/dev/block/platform/msm_sdcc.1/by-name/userdata on /data type ext4 (rw,relatime,user_xattr,acl,barrier=1)
/ $ umount /system
umount /system
/ $ umount /data
umount /data
Installing
After this we have changed our partition sizes, and can now flash our ROM onto the phone. In order to avoid bricking other electronic devices, we choose to attach as few objects to the phone, including SD cards. Thence, we should use sideloading to install update.zip s. The process might take a long time through sideloading, but it’ s certainly safer than from SDcards.

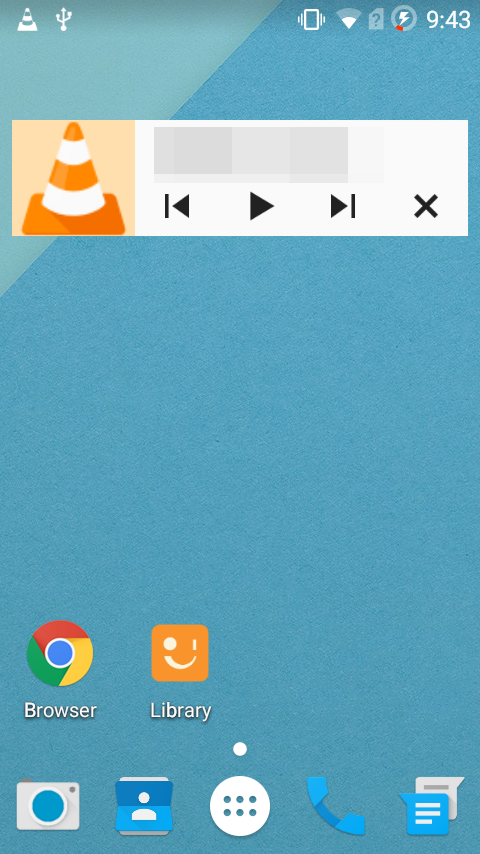
The phone should now be ready for use. Some ROMs contain malicious software or adware, which should have been get rid of. Since we are root now, we can simply remove the packages from /system/app. A couple of reboots of the phone is highly recommended so that bugs may reduce in some aspect (sounds unreasonable). We can then add our own favourite applications, and then it would be ready to use. This is a screenshot of my phone (Do not mind the time, I haven ‘t changed it yet):

However, it seems that Xiaomi 1S is not ready for CM12 and might never be ready. The current version I am using is CM11, which is based on Android 4. 4. 2, while CM12 is based on Android 5. 0, which requires a higher version of kernel. I do not suggest your flashing your Xiaomi 1S to CM12, as that would pose an abundant number of security vulnerabilities and stability issues.